Cookies help us deliver our services. By using our services, you agree to our use of cookies.
You have no items in your shopping cart.


Laminate Installation Guide
Underlay for Underfloor Heating
When installing over underfloor heating, you want to maximise the heat coming up HeatWave Its made from very pure polyurethane foam, so is very soft and gives unbeatable underfoot comfort whilst allowing the underfloor heating to do its job.
DPM (Damp Proof Membrane)
If you're laying your new laminate floor over concrete or water-based underfloor heating, it's recommended an underlay with a Damp Proof Membrane, as this will eliminate the risk of moisture travelling up from the ground and soaking your floor from underneath.
Laying Laminate Underlay
Once the subfloor is prepared and is free from dust and debris, you can start to unroll your chosen underlay to the entire floor area. position the underlay at one end of the room and unroll from the wall. Continue until floor space is covered with the underlay, making sure the edges meet but don't overlap as this will create an uneven floor.
Laminate Fitting
It is recomended to avoid boards less than 60mm wide around the perimeter of each area. The best way to do this is to measure the width of your room and divide that by the width of your board.
1. Start in a corner, working left to right. Place the end with the short tongue against the wall. Use expansion spacers if requied along the wall to ensure a 10mm expansion gap. This gap will allow the natural expansion and contraction in size throughout seasons, without it your lamainate flooring could become damaged.
2. Lay the next board, interlocking the tongue and groove design together. Carry on until the end of the row.
3. If the last board of the row is longer than required, you'll need to cut it to size. To accurately measure the board to the exact size of the gap, turn it 180 degrees and lay it next to the previous board. Using a stright edge and pencil to draw a line across the board to where it meets the previous board. Now, freshly cut side facing the wall.
4. For both stability and aesthetics, it's best to keep the ends of the boards at least 30cm apart. If the off-cut board from the previous row is longer than 30cm, use this as the starting board of the second row.
5. For majority of laminate flooring manufactures, you will need to fit long edges together at 30 degrees from the floor before lowering it and locking it in place. The boards should then slide together. Do keep in mind diffrent manufactures might use a verity of locking mechanisms.
6. If the last row needs to be cut lengthways, lay the planks as pictured below. The line you draw along the edge of the top plank is where you need to cut the middle plank to fit against the wall.
Fitting Laminate Around Pipes
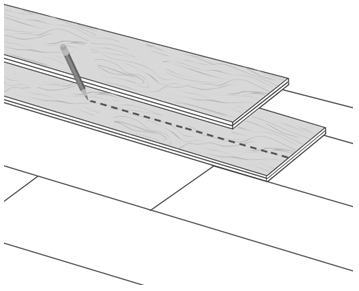
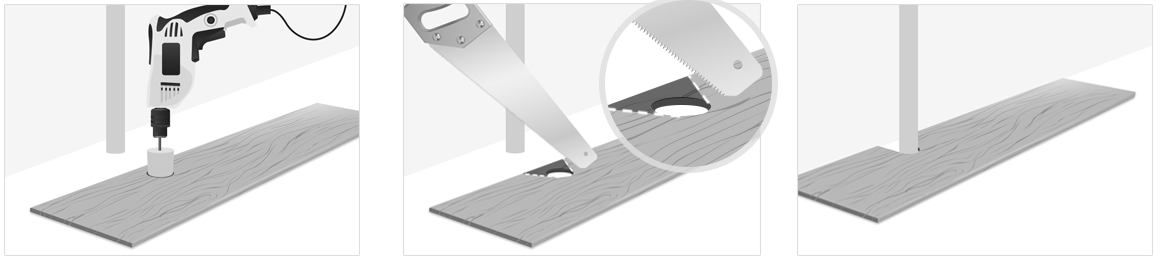
If you're fitting laminate around any pipes, mark the position of the pipe on the board you're going to lay. Drill a hole about 16mm larger in diameter than the pipe and make two angle saw cuts from the board edge to the sides of the hole to cut a wedge out of the board. Fit the board and carefully glue the small off-cut wedge behind the pipe.
Laminate Trims & Profiles
Specialised Trims covers the transition between different types of floors. These can cater for changes in heights for diffrent floor types.
Incizo Profile
Incizo profiles are available for all Quickstep laminate floors and colour match throughout there ranges this 5 in 1 profileecan be used for the following situations.
(1) as an expansion profile which makes a neat transition between similar thickness.
(2) as a transition profile, ideal for use against vinyl.
(3) as an end profile, can be used against a hearth, patio door, front door, back door, matt well or to butt up to a step.
(4) as a profile for transition to carpet.
(5) as a stair nosing. when used in conjuction with a aluminium base profile.
Mdf profiles
Mdf Tee sections for joinng to hardfloors of the same height
Mdf Ramps for joining floors of differing heights
Mdf End for finishing around fireplaces, matwells, patio & entrance doors.
Aluminium Z sections
Z Sections are used for joining hardfloors to carpets.